by Kathleen Austin & Gerald Kendall
Part 1 provided an introduction to projects and the need to plan a project. Part 2 discussed how to ensure the correct level of detail in a project network. Part 3 began the first of the 10 steps to building an executable project plan. Basis for these posts: Advanced Multi-Project Management: Achieving Outstanding Speed and Results with Predictability, by Gerald I. Kendall and Kathleen M Austin, J. Ross Publishing, 2012. Note: Some figures in this part of the blog begin with “14-“; this indicates the book chapter for reference.
Step 2: Define the tasks required for the backbone of the project network (one main path), starting at the end of the project and working toward the beginning.
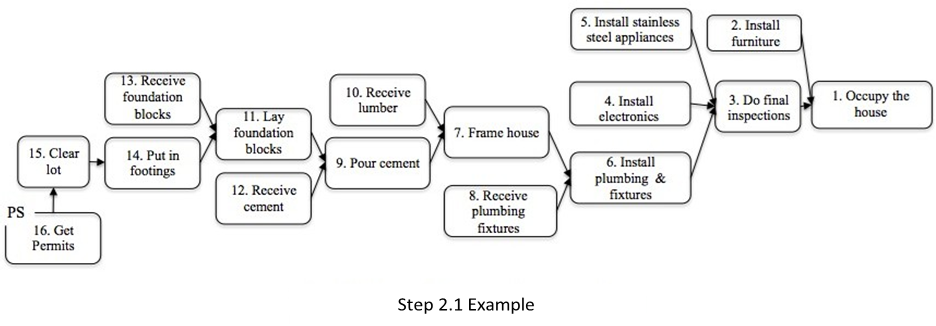
Network building begins only after Step 1, the stakeholder needs, are clearly documented and understood! Every project network has some long strings of tasks with many other tasks “feeding into” these strings. For example, consider the string of tasks in building a house. After the house is framed, other strings of tasks would be performed before the builder would arrange final inspections (e.g., electrical, plumbing, dry-walling, painting, etc.). But to start building the network, we only consider one of these strings, and we’ll use the example below as a starting point as well as the results of the stakeholders meeting, also shown below.

Step 2 defines the tasks required for the backbone (or spine) of the project network, starting at the end of the project and working towards the beginning. This is where the leadership of the person who thinks network building is “fun” is crucial! In addition, include the project manager, and one or two other team members. The team members should be people who understand the overall project requirements, how the organization works, and all resource skill sets in general. If the organization has a project management office (PMO), someone from this office would be involved. These team members will remain for all following steps (important!)
| Scope/Goal(s): |
| · Ready to occupy 3000 sq ft lakefront, ranch-style, 3-bedroom, two- office, brick home with attached 3-car garage no later than Oct. 15th |
| Customer(s): |
| · Mr and Mrs John Doe (no children, no pets) |
| Tangible Deliverables/Functional Requirements of Output(s): |
|
· Hardwood floors in all but kitchen and bathrooms · Ceramic floors in kitchen, bathrooms, mudroom · Spa-like master bath · All granite countertops · Stainless steel high-end appliances, including icemaker, gas range, double ovens, and warming drawer · Custom birch cabinets and finishes · High-end finishes throughout · Lakeside: floor to ceiling windows, French doors · Full house electronics (TV, games, security, high-speed wireless, intercom and whole-house surge protection) · Summer kitchen on extended lakeside deck · Full formal landscaping including path to dock and boathouse |
| Major items / specifications needed as Project inputs: |
| · Hot tub on lakeside deck |
| Bottom-Line Impact to Organization: |
| · $ 50,000 net profit |
| Budget: |
| · $450,000 |
| Risks: |
|
· Permitting and inspection processes · Weather · Tile contractor · Electronics installer |
| Sponsor Criteria: |
| · Deck and dock of Timber-Tek like material |
Output of a Stakeholder’s Meeting
Before We Begin: Some Network Building Tips…
- Use sticky notes (Post-It®1 type notes or pieces of paper and Post-It® glue sticks) large enough to write on and large sheets of paper to begin network building.
- We strongly recommend that you do NOT begin building your project network on the computer; build it on large paper so that you and your team can see the interconnections and add to Put the network into the computer only when you are ready to print or plot it.
First Box on the Network Diagram
- Using the Stakeholders Meeting Results from Step 1, pick a tangible deliverable that is produced later in the project. At this point, do not worry about the other tangible deliverables; they will be built into the network in subsequent Using the example above, we select the item of scope to have the house available to occupy by October 15th. The verb is:
“Occupy the house.”
Write the selected starting point on a Post-It® and place it on the far right of a large sheet of paper. The tangible deliverable should be written as a sentence minus the subject, starting with an action verb. Note that the date is not included in the task name; this will come as a result of the scheduling. Note also that there are no resources or times associated with the task at this point. To start: (No subject) action verb object.
Some ask why we build a network backwards, starting from the end, rather than forward, starting from the beginning. Working backwards, we include ONLY those tasks that are absolutely necessary as inputs to the next step. By working this way, we find that much less detail is required, yet the end result still meets all stakeholder needs.
For example, assume we have a wedding project. If you try planning this from the beginning, you can probably think of dozens of tasks that need to be done, all muddled together in your brain. However, working from the end, the last task is for the clergy/official to marry the couple. What must we have immediately before we accomplish this task? We must have the couple in place, the guests seated, the clergy/official ready and the wedding music playing. We can continue working backwards on any one of these streams, and will find that there are typically only one or two items at a time we need to identify immediately before each task. The network is constructed in a logical, orderly way and we only identify those elements that we must have to meet the end goals.
Boxes and Arrows
A project network consists of boxes and arrows. The boxes contain the work of the project and will have resources and time estimates identified in later steps. The arrows are used to indicate handoffs of work between boxes.
An arrow indicates that a box on the right of an arrow must have the input from the box(es) to the left of the arrow before it can start work. Output from the left is input to the right3. For example, as shown above, we must have the guests seated before performing the wedding ceremony. There are actually two types of “must have”, which are discussed later.
Building the Backbone
Building the backbone requires knowing the first box you will use on the network diagram and understanding how boxes (tasks) and arrows are used. We have that information so it’s time to understand the process for building the backbone.
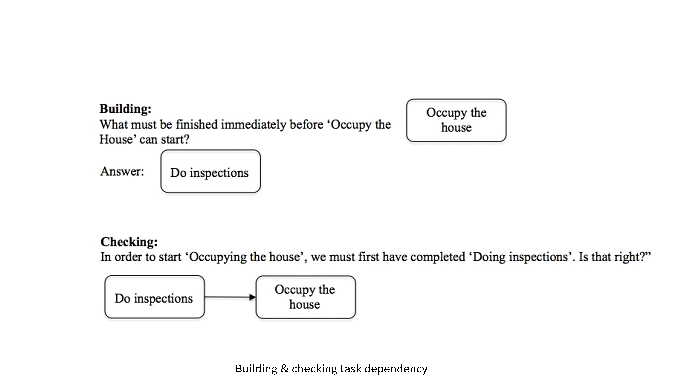
- Ask, “What must be completed (or finished) immediately before the task on the right can begin?” g., “What must be completed immediately before ‘Occupying the house’ can start?”
Tip: [Asking out loud helps you to listen/think about the question more closely. Fill in the underlined words with the actual wording of the task on the right – the task at the tip of the arrow.]
Another way of asking the question is, “What input is required before the Does can begin occupying the house?” The answer should be written on a Post-It in task format (starting with the action verb) and placed immediately to the left of the first task. Check the logic by saying, “In order to start (the task on the right), we must first have completed (the task on the left)”. If the team agrees, write the arrow connecting the two tasks. Note that sometimes “ing” must be added to the verbs to make the building and checking sentences flow. See below.

- Ask, “Is there anything else that must be completed immediately before (the task on the right) can start?” or “Is any other input required to be able to start (the task on the right)?” Use a Post-It to capture that task, ensuring it is written in the correct format (starting with an action verb, no subject, sentence that describes what must be completed). Check the logic by saying, “In order to start (the task on the right), we must first have completed (the task on the left)”. If the team agrees, write the arrow connecting the two tasks (tail of arrow at predecessor, tip of arrow at successor). Repeat this until all tasks that must be completed immediately before the starting task have been identified. Don’t forget to build and check every dependency using the wording above. This is also a good time to start uniquely numbering each task for identification purposes. This will make it much easier for people who have a comment or question on one of the many boxes to describe which box they are referring to (see below).

Sometimes there can be disagreement among the team members about whether or not a task belongs immediately before the task on its right (whether its output is required as an input to the next task or whether it is needed earlier in time). If this occurs, leave the task where it is for
now; if it truly is needed earlier, the process will identify that and the task can be moved earlier at that time.
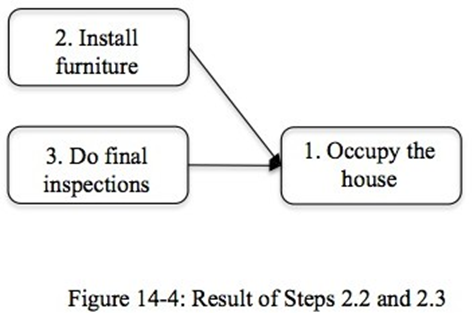
Notes: This process can seem counter-intuitive. E.g., “Install furniture” must be complete before “Occupy the house” can start, and the next step for many is to look for what must be completed immediately before “Install furniture” – what we would call looking for the linear flow. Do not fall into this trap! Identify all the required tasks required immediately before the task on the right – that is the best way to ensure all the inputs that the task on the right needs to begin will be available. There is no fixed number of arrows required for a task. Remember to identify ONLY the inputs needed to begin the task on the right. This step is to identify all the significant necessary dependencies (predecessor tasks) to the task on the right (successor task).
As a final check before moving to the next step, read the connections as “In order to achieve (task on the right), we must first complete (task on the left) and (task on the left) for as many predecessor arrows as exist. In the example above, it would read, “In order to occupy the house, we must first install furniture and do final inspections.” If any additional necessary dependencies come to mind (that must be accomplished immediately before the successor task can start), please add them appropriately.
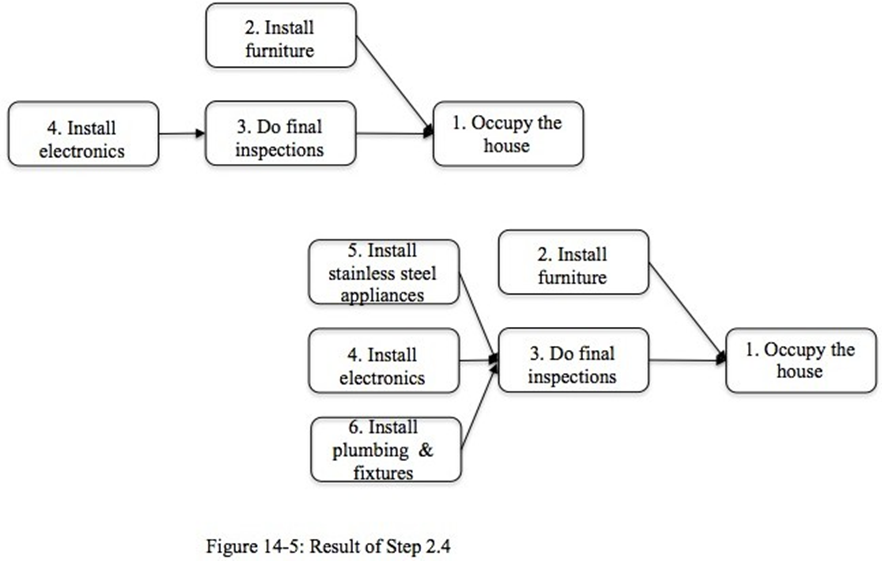
- In order to continue building the backbone of the network, examine each of the tasks to the left that you just inserted. Based on the team’s understanding of those tasks, which one requires the most work to be done? That will be the task to build the rest of the backbone Repeat steps 2.2 and 2.3 to identify first one task to the left of your newly selected “right” task and check it and then identify all other required tasks to the left. See below.

- Repeat Step 4 until you have reached a task that could be started today, if the project go- ahead was given. That task is called a path start and should be designated as such. Typical conventions are to put a “PS” on the task. (Some put “EP” for Entry Point; either is acceptable. Pick one and use it consistently.) Congratulations! Your team has completed the backbone! See below.
Note that we have only worked back to the beginning on one path. Even though other tasks have no tasks to the left of them (e.g., task 13, receive foundation blocks), we have not yet determined that this is, in fact, a path start task. Further steps in the process will complete the network.

Some organizations require the project network to look like a “football” (American-style) – that is one starting point and one ending point. While we agree on having one ending point, there is not a requirement for a single starting point. Check to make sure that a single starting point isn’t really an administrative or overhead task – these should not be in the project network.
Only tasks that are necessary to create or produce the tangible deliverables of the project should be in the project network.
As the backbone emerges, it becomes tempting to begin adding tasks that “you know” must be in the final network for the project. Do not do that – yet. It is very important to keep network building at a high level, breaking down into more detail only when and as required. Too often, network builders go too detailed, too early; this makes for networks that are very difficult to manage and can significantly lengthen the time it takes to build a project network. It really doesn’t matter what you “know” must be in the network, right now. The required level of detail will make itself known through the process of network building – which does have multiple steps and multiple risk avoidances/risk mitigations built in. This is the beginning of the first pass! Staying at a less-detailed level can be very difficult for experienced project planners and managers. This can be hard to “un-learn”! Please be patient and let the network develop over the required steps!
Conclusions
Network building must begin only when the stakeholder needs have been clearly identified and documented, from Step 1 of this process. Once this is complete, the following steps are
performed by a very small team (2-4 people) who know both the overall project goals and the organization very well. The steps to build the backbone are:
Step 2. Define the tasks required for the backbone of the project network (one main path), starting at the end of the project and working towards the beginning.
- Using the Stakeholders Meeting Results from Step 1, pick a tangible deliverable that is produced later in the project.
- Ask, “What must be completed (or finished) immediately before (the task on the right) can start?”
- Ask, “Is there anything else that must be completed immediately before (the task on the right) can start?” or “Is any other input required to be able to start (the task on the right)?”
- In order to continue building the backbone of the network, examine each of the tasks to the left that you just Based on the team’s understanding of those tasks, which one requires the most work to be done? That will be the task to build the rest of the backbone from. Repeat steps 2.2 and 2.3 to identify first one task to the left of your newly selected “right” task and check it and then identify all other required tasks to the left.
- Repeat Step 2.4 until you have reached a task that could be started today, if the project go-ahead was This task is called an entry point or path start task and should be designated as such. Typical conventions are to put an “EP” or “PS” on the task.
Endnotes
- Post-It® is a trademark of
- Stephen R. Covey
- For those readers who are familiar with the jargon of project networks, this means the only arrows used in the project network are “finish to start” arrows.
Next Post
- Step 3: Add the tasks required to build the skeleton (other paths), working backward from the end, completing all other paths


